
Oracle Database là một hệ thống CSDL quan hệ, đa mô hình được tạo ra bởi tập đoàn Oracle. Đây là một CSDL thường đươc sử dụng
để chạy online transaction processing (OLTP), data warehousing (DW) hoặc chạy đồng thời OLTP và DW. Oracle database có thể được
triển khai on-prem, on-cloud, hoặc hybrid cloud
I. Chuẩn bị cài đặt
I.1 Hệ thống và gói cài đặt
-
Hệ điều hành: Oracle Linux 7.9
-
Oracle Database 19c (19.3) for Linux x86-64: LINUX.X64_193000_db_home.zip
Có thể download bản cài đặt tại:
- https://www.oracle.com/database/technologies/oracle19c-linux-downloads.html
- https://edelivery.oracle.com
I.2 Thiết lập môi trường cài đặt
Chỉnh sửa file /etc/host và /etc/hostname
# Chỉnh sửa /etc/host# <Địa chỉ IP> <Tên máy đầy đủ hợp lệ> <Tên máy>127.0.0.1 localhost localhost.localdomain localhost4 localhost4.localdomian410.0.2.15 rabbit# Chỉnh sửa /etc/hostnamerabbit
Cài đặt các package cần thiết và thiết lập môi trường
- Thiết lập tự động
Sử dụng gói “oracle-database-preinstall-19c” để thực hiện cài đặt tất cả thiết lập cần thiết, thực thi lệnh.
yum install -y oracle-database-preinstall-19c
- Thiết lập thủ công
Vì tính bảo mật nên nhiều công ty sẽ yêu cài đặt Offline không sử dụng gói “oracle-database-preinstall-19c”, để thực hiện cài đặt ta cần thực hiện cài đặt như sau
Thêm các dòng sau vào tệp “/etc/sysctl.conf”.
fs.file-max = 6815744kernel.sem = 250 32000 100 128kernel.shmmni = 4096kernel.shmall = 1073741824kernel.shmmax = 4398046511104kernel.panic_on_oops = 1net.core.rmem_default = 262144net.core.rmem_max = 4194304net.core.wmem_default = 262144net.core.wmem_max = 1048576net.ipv4.conf.all.rp_filter = 2net.ipv4.conf.default.rp_filter = 2fs.aio-max-nr = 1048576net.ipv4.ip_local_port_range = 9000 65500
Chạy một trong hai lệnh sau để xem thay đổi các tham số của kernel, sau khi đã chỉnh sửa.
/sbin/sysctl -p# Or/sbin/sysctl -p /etc/sysctl.d/98-oracle.conf
Thêm các dòng sau vào tệp "/etc/security/limits.d/oracle-database-preinstall-19c.conf"
oracle soft nofile 1024oracle hard nofile 65536oracle soft nproc 16384oracle hard nproc 16384oracle soft stack 10240oracle hard stack 32768oracle hard memlock 134217728oracle soft memlock 134217728
Các gói cần thiết để cài đặt oracle database 19c, có nhiều gói đã đc cài đặt sẵn:
bcbinutilscompat-libcap1compat-libstdc++-33dtrace-modulesdtrace-modules-headersdtrace-modules-provider-headersdtrace-utilselfutils-libelfelfutils-libelf-develfontconfig-develglibcglibc-develkshlibaiolibaio-devellibdtrace-ctf-devellibXrenderlibXrender-devellibX11libXaulibXilibXtstlibgcclibrdmacm-devellibstdc++libstdc++-devellibxcbmakenet-tools # Clusterwarenfs-utils # ACFSpython # ACFSpython-configshell # ACFSpython-rtslib # ACFSpython-six # ACFStargetcli # ACFSsmartmontoolssysstat
Đảm bảo đĩa Oracle linux 7 đã được mount, cài đặt các package từ đĩa
rpm -Uvh <tên gói rpm>rpm -Uvh binutils-2*x86_64*rpm -Uvh glibc-2*x86_64 nss-softokn-freebl-3*x86_64rpm -Uvh glibc-2*i686 nss-softokn-freebl-3*i686rpm -Uvh compat-libstdc++-33*x86_64*rpm -Uvh glibc-common-2*x86_64*rpm -Uvh glibc-devel-2*x86_64*rpm -Uvh glibc-devel-2*i686*rpm -Uvh glibc-headers-2*x86_64*rpm -Uvh elfutils-libelf-0*x86_64*rpm -Uvh elfutils-libelf-devel-0*x86_64*rpm -Uvh mpfr-2.4.1-6.el6.x86_64*rpm -Uvh cpp-4.4.7-17.el6.x86_64*rpm -Uvh ppl-0.10.2-11.el6.x86_64*rpm -Uvh cloog-ppl-0.15.7-1.2.el6.x86_64*rpm -Uvh gcc-4*x86_64*rpm -Uvh gcc-c++-4*x86_64*rpm -Uvh ksh-*x86_64*rpm -Uvh libaio-0*x86_64*rpm -Uvh libaio-devel-0*x86_64*rpm -Uvh libaio-0*i686*rpm -Uvh libaio-devel-0*i686*rpm -Uvh libgcc-4*x86_64*rpm -Uvh libgcc-4*i686*rpm -Uvh libstdc++-4*x86_64*rpm -Uvh libstdc++-4*i686*rpm -Uvh libstdc++-devel-4*x86_64*rpm -Uvh make-3.81*x86_64*
Kiểm tra xem gói đã được cài đặt hay chưa:
yum list | grep dtrace-modules
Tạo groups và users mới.
groupadd -g 54321 oinstallgroupadd -g 54322 dbagroupadd -g 54323 opergroupadd -g 54324 backupdbagroupadd -g 54325 dgdbagroupadd -g 54326 kmdbagroupadd -g 54327 asmdbagroupadd -g 54328 asmopergroupadd -g 54329 asmadmingroupadd -g 54330 racdbauseradd -u 54321 -g oinstall -G dba,oper oracle
Các thiết lập khác
Thiết lập mật khẩu cho “oracle” user
passwd oracle
Đặt secure Linux thành disabled bằng cách chỉnh sửa tệp "/etc/selinux/config":
SELINUX=disabled
Nếu Linux firewall được kích hoạt, ta cần vô hiệu hóa hoặc cấu hình lại nó. Để vô hiệu hóa nó, thực thi câu lệnh.
systemctl stop firewalldsystemctl disable firewalld
Tạo các thư mục khác mà Oracle Database sẽ được cài đặt.
mkdir -p /u01/app/oracle/product/19.0.0/dbhome_1mkdir -p /data #Lưu datafilemkdir -p /fra #Lưu archive logmkdir -p /backup #Thao tác backupchown -R oracle:oinstall /u01 /data /fra /backupchmod -R 775 /u01 /data /fra /backup
Chú ý: các bước thiết lập trên cần sử dụng user: root, các bước tiếp theo sẽ sử dụng user "oracle" Đăng nhập user "oracle" từ "root"
su - oracle
Tạo script setup biến môi trường cho Oracle Database
cat > /home/oracle/scripts/setEnv.sh <<EOF# Oracle Settingsexport ORACLE_HOSTNAME=rabbitexport ORACLE_UNQNAME=orclcdbexport ORACLE_BASE=/u01/app/oracleexport ORACLE_HOME=\$ORACLE_BASE/product/19.0.0/dbhome_1export ORA_INVENTORY=/u01/app/oraInventoryexport ORACLE_SID=orclcdbexport PDB_NAME=orclpdbexport DATA_DIR=/u02/oradataexport PATH=/usr/sbin:/usr/local/bin:\$PATHexport PATH=\$ORACLE_HOME/bin:\$PATHexport LD_LIBRARY_PATH=\$ORACLE_HOME/lib:/lib:/usr/libexport CLASSPATH=\$ORACLE_HOME/jlib:\$ORACLE_HOME/rdbms/jlibEOF
Thêm một tham chiếu đến tệp “setEnv.sh” vào cuối của tệp “/home/oracle/.bash_profile”.
echo ". /home/oracle/scripts/setEnv.sh" >> /home/oracle/.bash_profile
Reboot lại server sau khi đã hoàn thành thiết lập
reboot
II. Tiến hành cài đặt Oracle Database
II.1. Cài đặt Oracle Database software
Sau khi reboot xong, ta sẽ thực hiện cài đặt qua ssh bằng tool xshell
Lưu ý: để có thể cài đặt tương tác GUI cần ssh trực tiếp đến user
oracle, đảm bảo server đã cài đặtx11 Forwarding
cd $ORACLE_HOME# Orcd /u01/app/oracle/product/19.0.0/dbhome_1# Unzip software.mv /Downloads/LINUX.X64_193000_db_home.zip /u01/app/oracle/product/19.0.0/dbhome_1unzip -oq LINUX.X64_193000_db_home.zip# Interactive mode../runInstaller
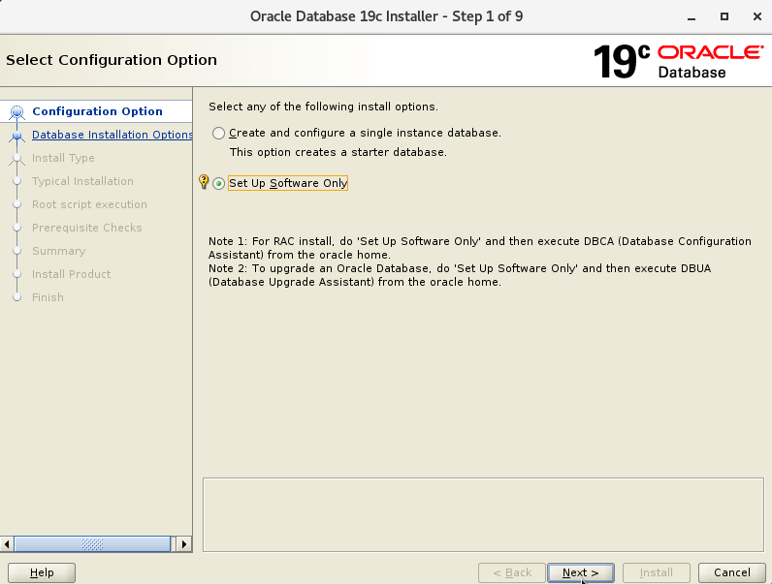
Chọn Set Up Software Only và nhấn Next
 Chọn
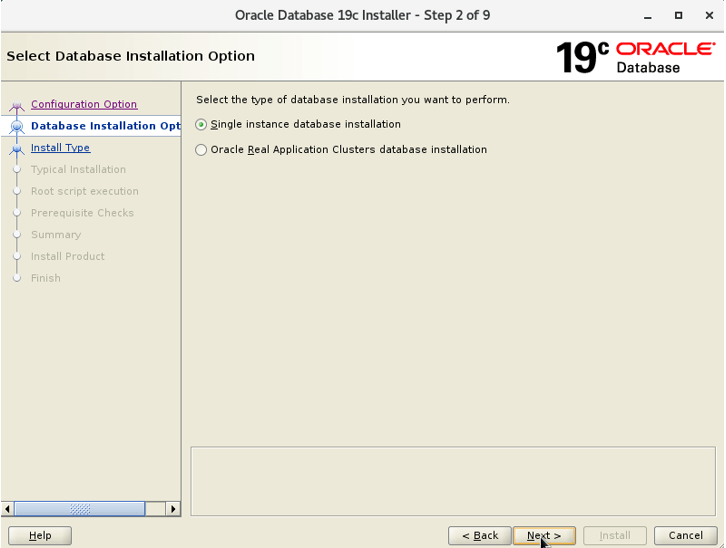
Chọn Single instance database installation và nhấn Next
 Chọn
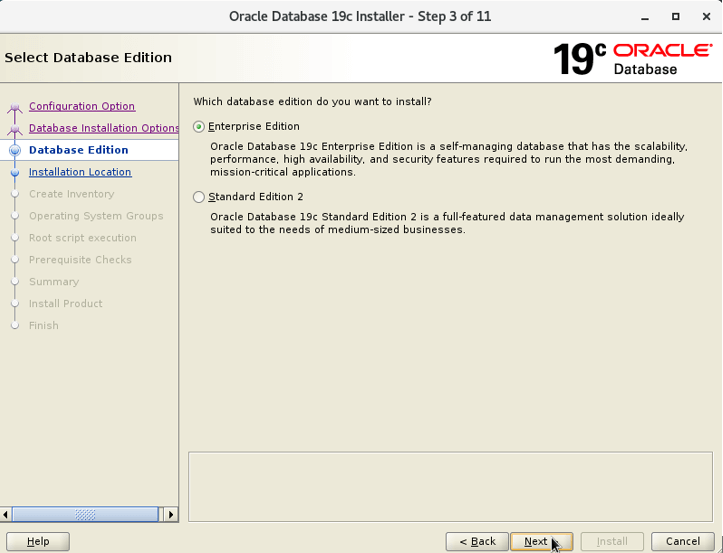
Chọn Enterprise Edition và nhấn Next
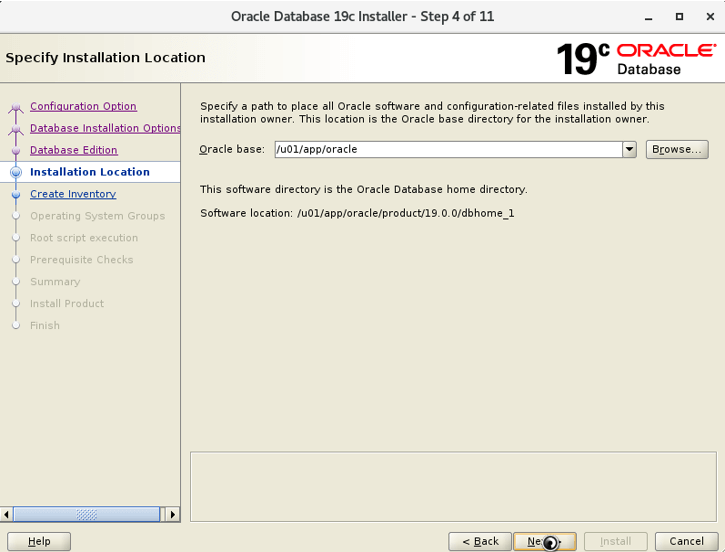
 Thiết lập đường dẫn đến thư mục
 /u01/app/orcale nơi đặt các tệp phần mềm và cấu hình liên quan và nhấn Next
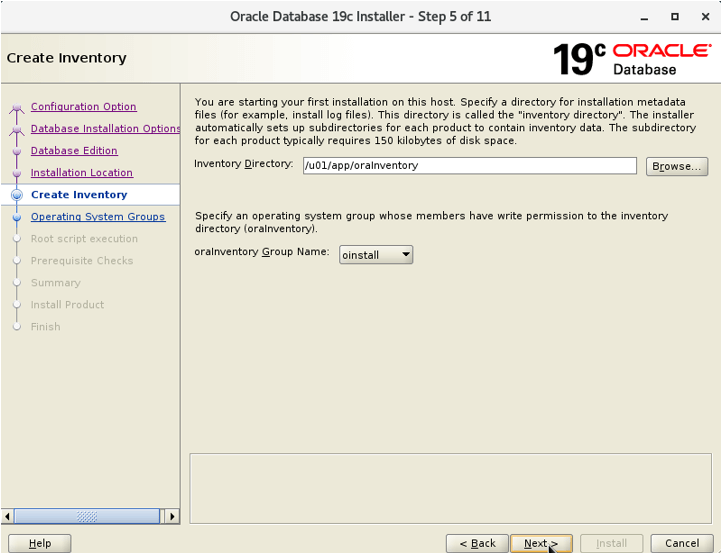
 Chọn đường dẫn đến thư mục
 /u01/oraIventory để lưu những tệp metadata cho cơ sở dữ liệu và nhấn Next
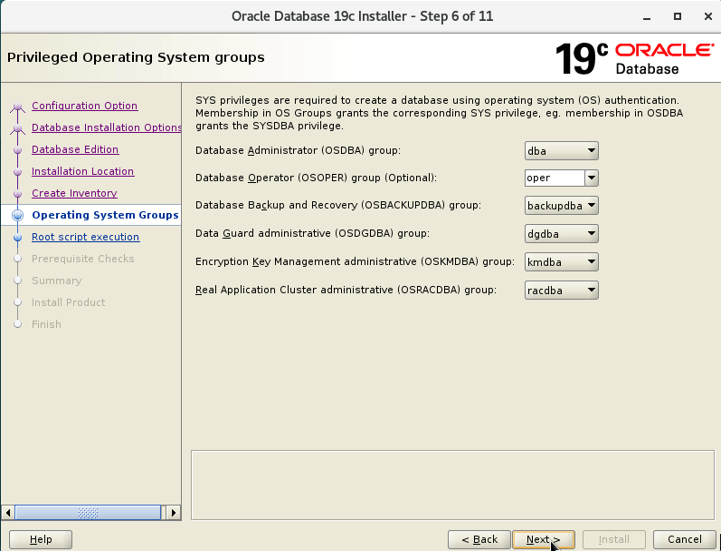
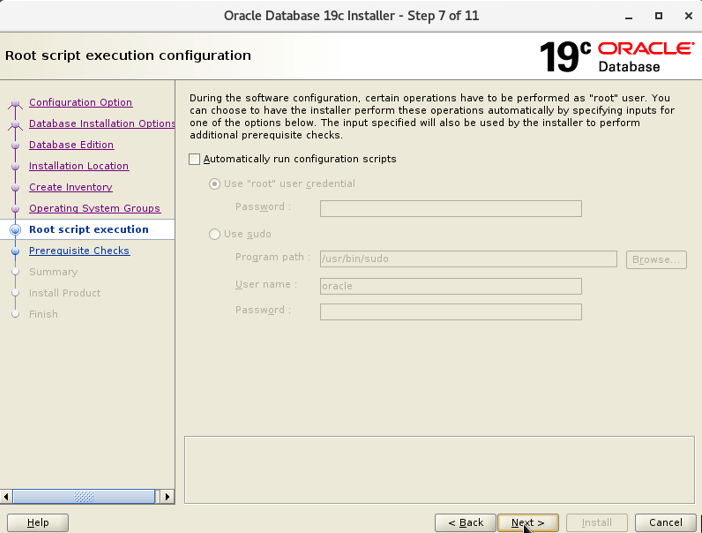
 Lựa chọn theo hình dưới và nhấn
 Next
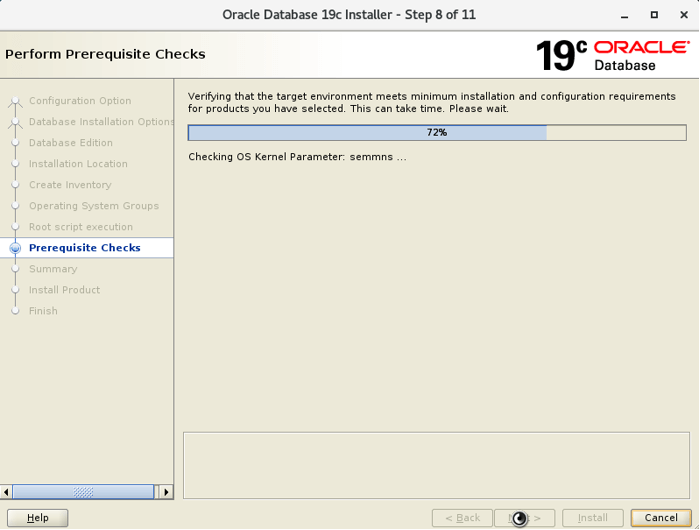
 Hệ thống đang kiểm tra các điều kiện để cài đặt.
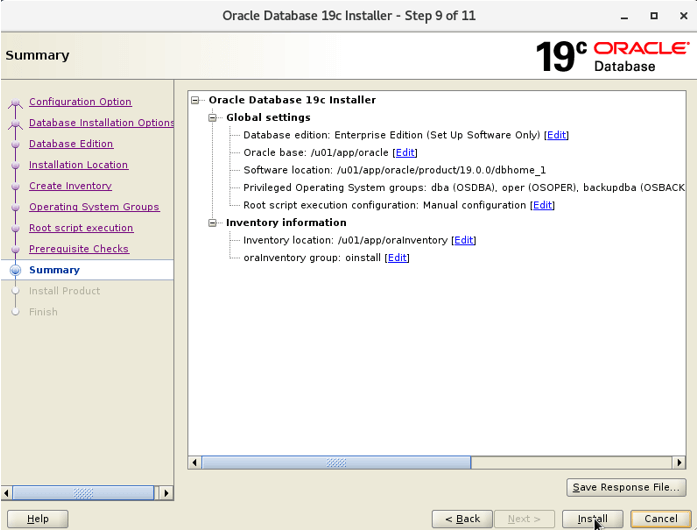
 Thông tin chi tiết, tổng quan về việc cài đặt, nhấn
 Install để tiến hành quá trình cài đặt
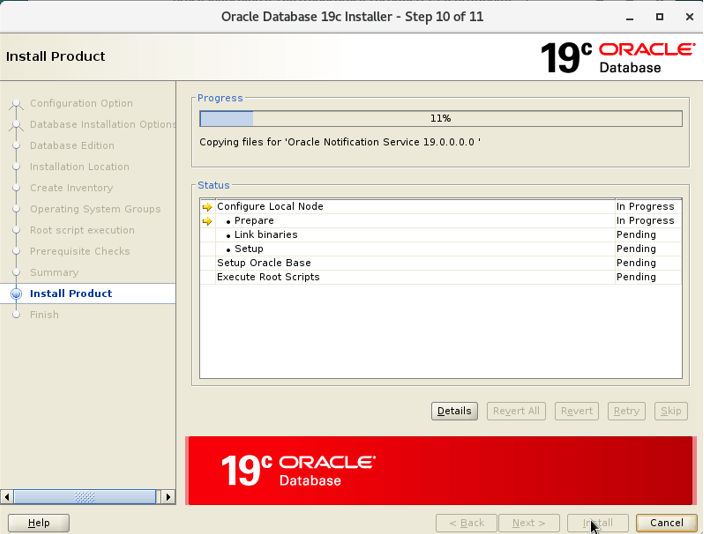 Chạy các scripts trong thông báo sau khi cài đặt hoàn tất.
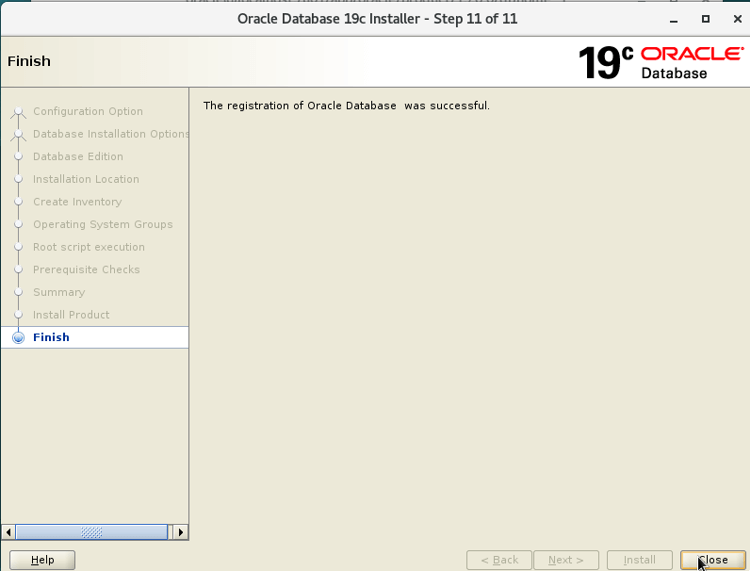
 Nhấn
Nhấn close để hoàn tất quá trình cài đặt
II.2 Khởi tạo database với GUI
Để tạo một database, đăng nhập oracle user, chạy tệp bash .bash_profile thiết lập biến môi trường
[oracle@rabbit ~]$ . .bash_profile
Chạy câu lệnh để hiển thị GUI Database Configuration Assistant để quản lý cơ sở dữ liệu:
[oracle@rabbit ~]$ dbca
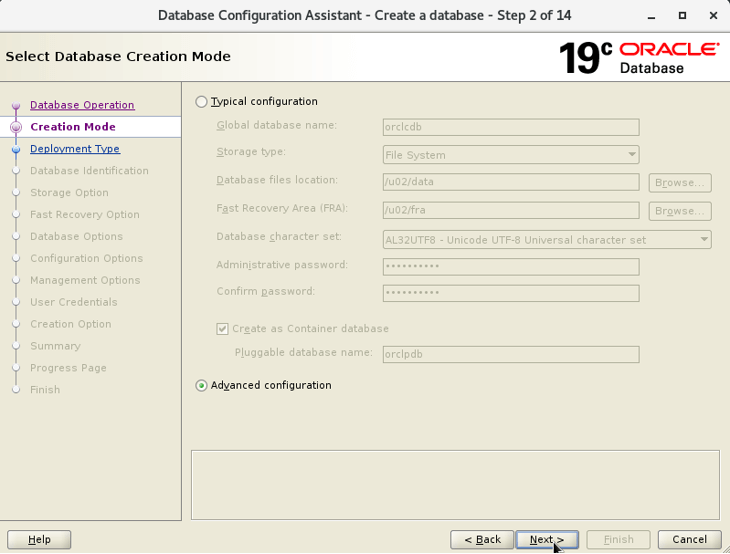
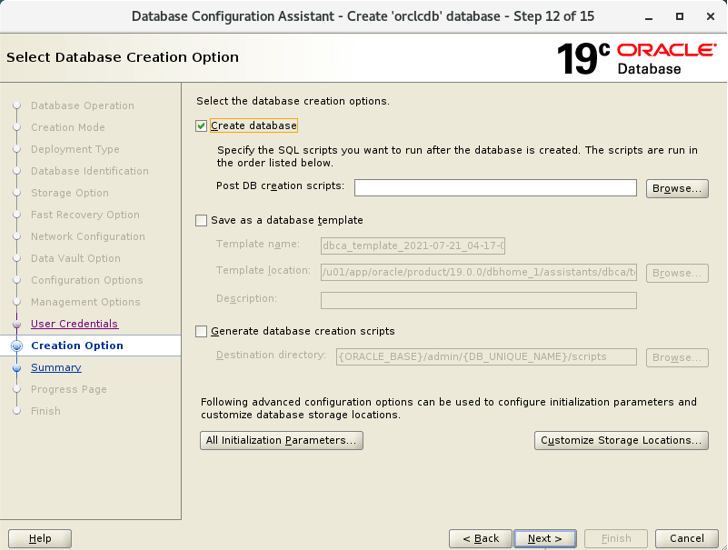
Tích chọn Create a database và nhấn Next
 Nhấn
Nhấn Next
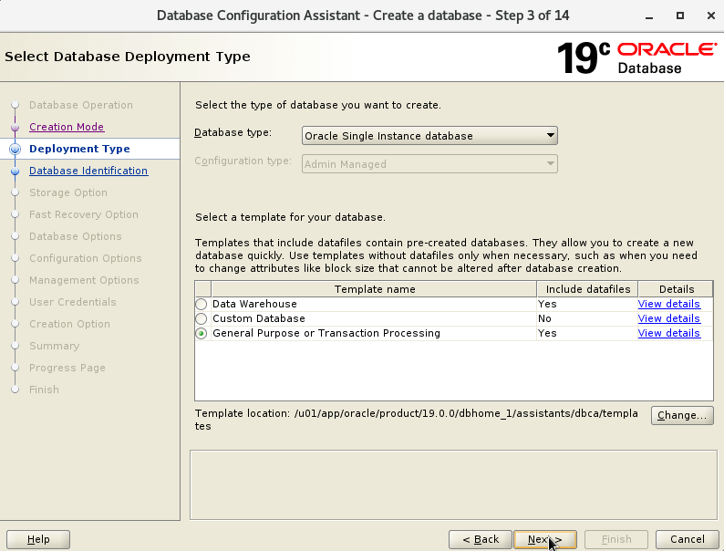
 Mục
Mục Database type Chọn Oracle Single Instance database, chọn template General Perpose or Transaction Processing nhấn Next
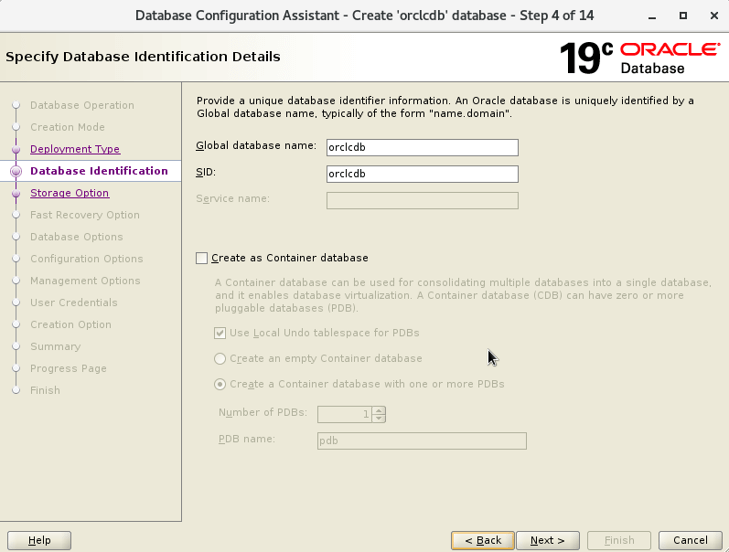
 Điền
Điền Global database name và SID để kết nối đến database
Lưu ý: SID phải trung với biến môi trường
ORACLE_SIDở trên
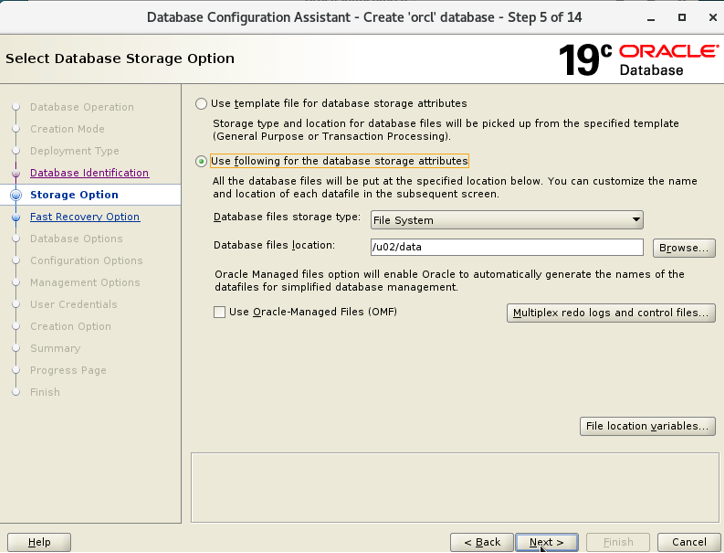
 Chọn nơi lưu trữ datafile
 Database files localtion, thay đổi định dạng tên hoặc thêm redo logs, control file chọn Multiplex redo logs and controls file
xem các giá trị biến chọn File location varriables và nhấn Next để tiếp tục
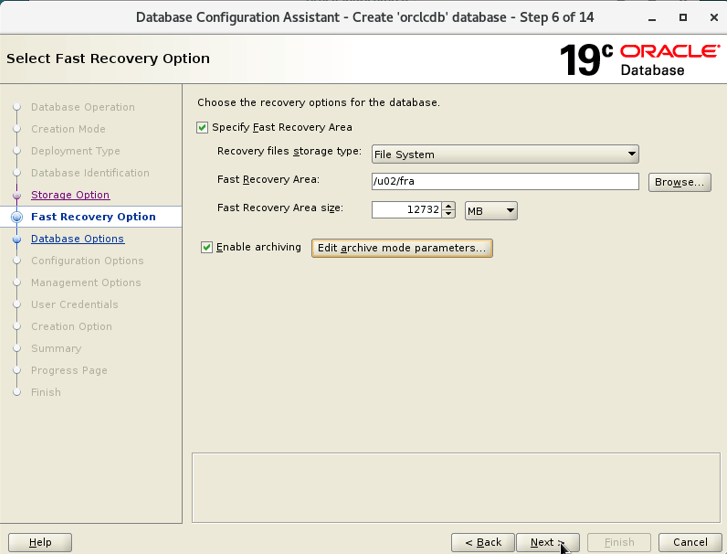
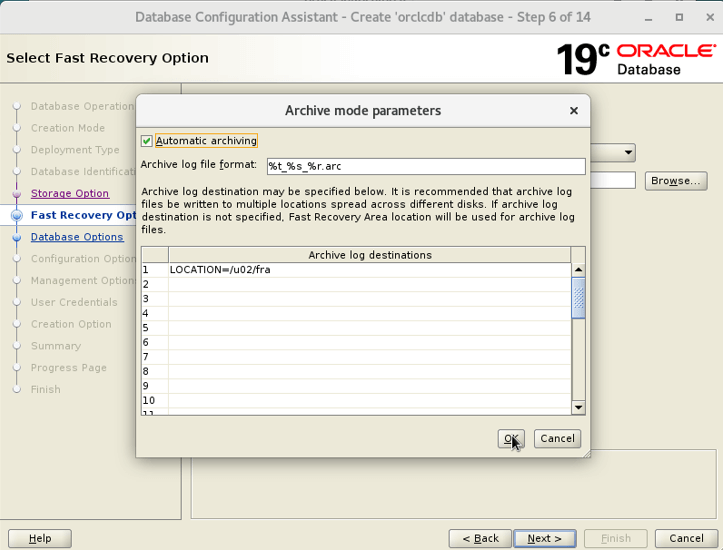
 Kích hoạt Fast Recovery,
 Recovery files storage type Chọn loại file hoặc để mặc định, Fase Recovery Area chọn khu vực lưu recovery files,
Fase Recovery Area size thiết lập độ lớn file, tích chọn Enable archiving hỗ trợ việc backup data sau này, Edit archive mode parameters ... setup tên định
dạng của archive log file và vị trí lưu file
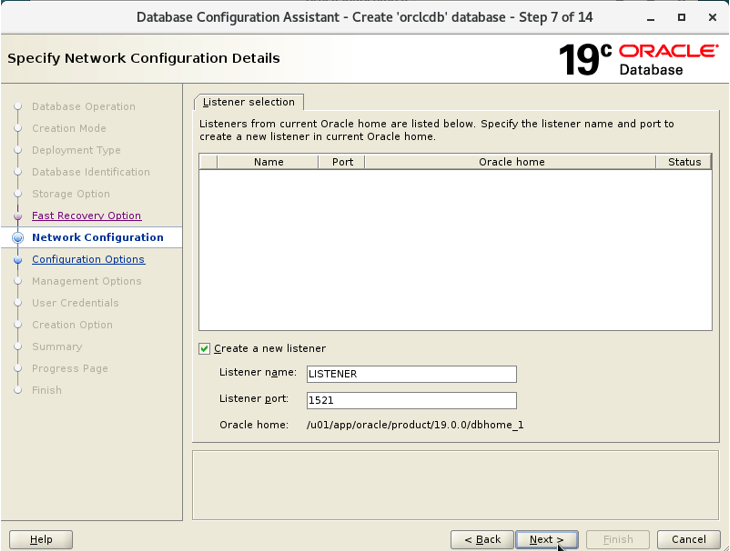
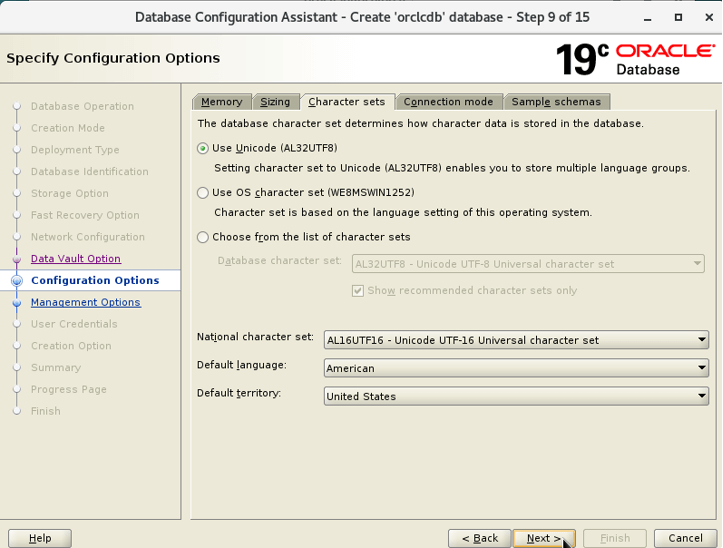
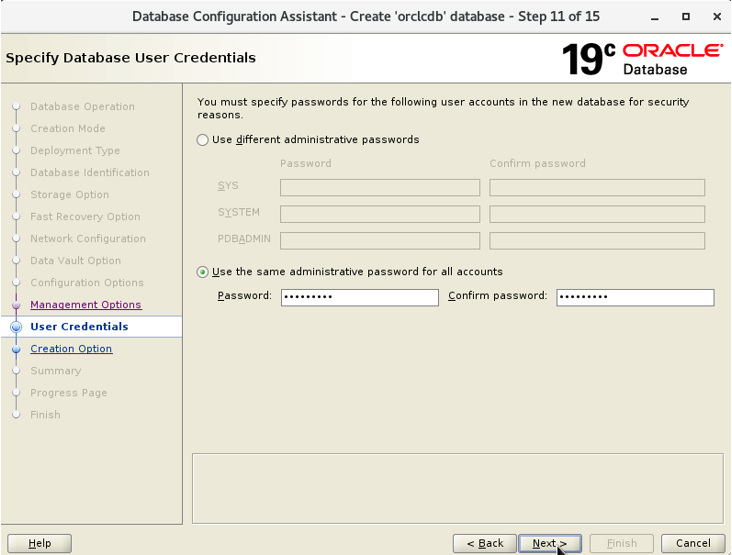
 Tích chọn
 Create a new listener và điền thông tin như hình, tạo một listener để có thể kết nối database từ client
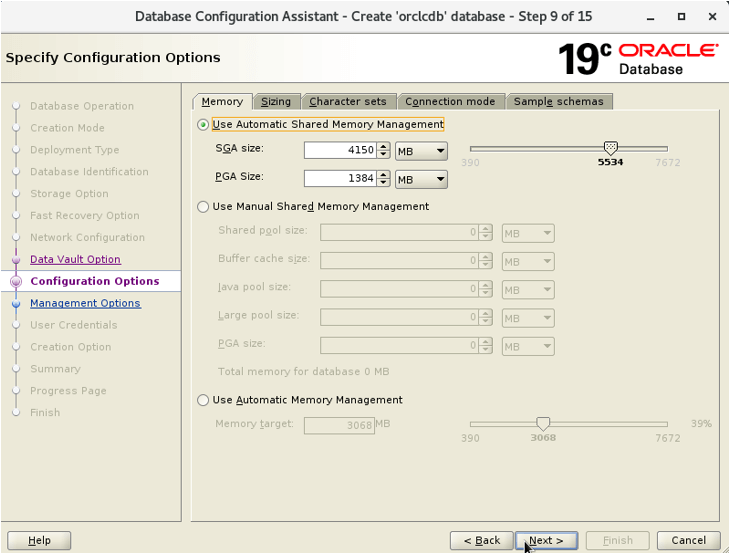
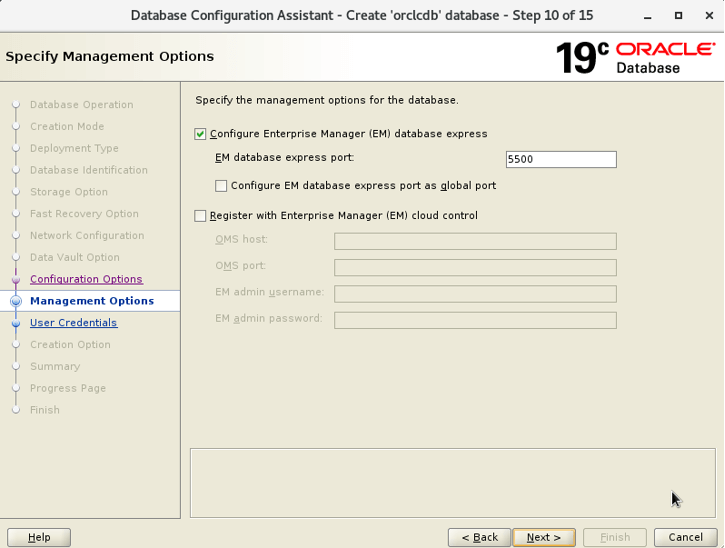
 Oracle recommend 20% Mem cho hệ thống, phần còn lại chia 20% cho PGA và 80% cho SGA đối với các hệ thống thông thường

II.3 Khởi tạo database silent
dbca -silent -createDatabase \-gdbname "${ORACLE_GDB}" -sid "${ORACLE_SID}" -templateName General_Purpose.dbc -responseFile NO_VALUE \-databaseConfigType SI \-createAsContainerDatabase false \-sysPassword "<your_password>" \-systemPassword "<your_password>" \-datafileDestination "${DATA_DIR}" \-recoveryAreaDestination "${FRA_DIR}" \-enableArchive true \-storageType FS \-characterSet AL32UTF8 \-nationalCharacterSet AL16UTF16 \-redoLogFileSize 200 \-totalMemory 2300 \-memoryMgmtType AUTO_SGA \-sampleSchema true \-databaseType MULTIPURPOSE \-initParams nls_language=AMERICAN,log_archive_format=%t_%s_%r.dbf \-createListener LISTENER:1521 \-emConfiguration NONE \-ignorePreReqs
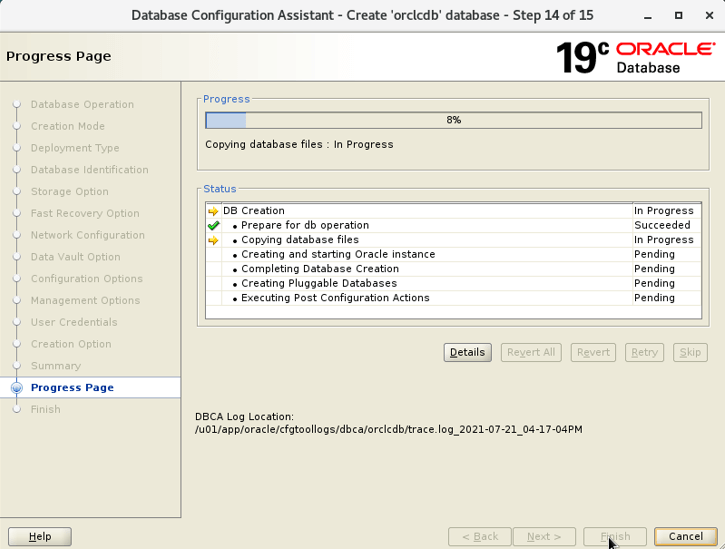
Khởi động database
[oracle@rabbit ~]$ sql / as sysdbaSQLcl: Release 19.1 Production on Thu Jul 15 02:05:38 2021Copyright (c) 1982, 2021, Oracle. All rights reserved.Connected to:Oracle Database 19c Enterprise Edition Release 19.0.0.0.0 - ProductionVersion 19.3.0.0.0SQL> startupORACLE instance started.Total System Global Area 2415918568 bytesFixed Size 9137640 bytesVariable Size 520093696 bytesDatabase Buffers 1879048192 bytesRedo Buffers 7639040 bytesDatabase mounted.Database opened.//database đã khởi chạy thành công
Chạy listener để có thể truy cập database từ phía client, đăng nhập oracle user chạy:
lsnrctl start
Sau đó ta có thể sử dụng các tool để kết nối và sử dụng Oracle Database.
III. Tự động startup database
Đăng nhập server bằng user "oracle" Sửa file “/etc/oratab” chuyển các cờ cho instance về “Y”:
orclcdb:/u01/app/oracle/product/19.0.0.0/dbhome_1:Y
Tạo file start_all.sh và stop_all.sh bằng câu lệnh
cat > /home/oracle/scripts/start_all.sh <<EOF#!/bin/bash. /home/oracle/scripts/setEnv.shexport ORAENV_ASK=NO. oraenvexport ORAENV_ASK=YESdbstart \$ORACLE_HOMEEOFcat > /home/oracle/scripts/stop_all.sh <<EOF#!/bin/bash. /home/oracle/scripts/setEnv.shexport ORAENV_ASK=NO. oraenvexport ORAENV_ASK=YESdbshut \$ORACLE_HOMEEOF//Gán quyền thực thi scriptschmod u+x /home/oracle/*.sh
Tạo một service để tự động start/stop Oracle Database, tạo service file /lib/systemd/system/dbora.service có nội dung.
Cần sử dụng user root or user sudo
[Unit]Description=The Oracle Database ServiceAfter=syslog.target network.target[Service]LimitMEMLOCK=infinityLimitNOFILE=65535RemainAfterExit=yesUser=oracleGroup=oinstallRestart=noExecStart=/bin/bash -c '/home/oracle/scripts/start_all.sh'ExecStop=/bin/bash -c '/home/oracle/scripts/stop_all.sh'[Install]WantedBy=multi-user.target
Reload lại systemd để apply service mới
systemctl daemon-reload
Start service và enable để nó tự động khởi động lại sau khi reboot
systemctl start dbora.servicesystemctl enable dbora.service
Tham khảo thêm: